

Most bathrooms end up with the same three prints from the same online shop, hung in the same spot over the towel bar. It works, but it doesn’t say much about the room or the person living in it. Bathroom wall decor ideas don’t have to stop at a frame and a print, especially since these walls deal with moisture, low light, and odd angles that a flat canvas print usually struggles with anyway.
This list skips the obvious stuff. You’ll find macrame, a single tile set into the wall like art, mismatched mirrors, sculptural lighting, and a few ideas that lean on texture instead of a picture at all. Some take an afternoon. A few take fifteen minutes and a drill. None of them require gutting the room or hiring anyone.
If your bathroom walls feel like an afterthought, these ideas give you a real starting point, whether you rent, own, or just want the room to finally look finished.
1. Hang a Macrame Panel Where a Frame Usually Goes

That empty stretch of wall behind the toilet almost never gets solved by hanging one more print. It just repeats a look that’s already sitting somewhere else in the house.
A macrame panel fills that space with texture instead of another picture, and it doesn’t need to match anything else in the room.
- Pick a width close to two thirds of the open wall so it doesn’t look stranded
- Choose raw, undyed cotton over dyed cord so it reads calm rather than craft fair
- Mount it on one center hook so it hangs straight even with daily humidity
Keep it a few inches clear of direct shower spray so the cord stays dry and doesn’t mildew over time.
2. Cluster Three Mismatched Mirrors Instead of One Big One
A cluster of mismatched mirrors bounces light into corners a single mirror never reaches, and it makes a small bathroom feel less boxed in. It also gives you a place to use shapes you actually like instead of settling for whatever fits the wall.
The trick is picking frames that share one thing in common, like finish or era, even if the shapes are completely different. Round, arched, and rectangular can sit together as long as the metal tones agree.
Hang the largest one at eye level first, then work the smaller two around it with even gaps rather than a perfect grid.
| One Large Mirror | Mismatched Cluster |
|---|---|
| Reflects light from one direction only | Bounces light from multiple angles |
| Needs a wide, uninterrupted wall | Works around outlets and sconces |
| One shape sets the whole tone | Each shape adds its own personality |
3. Style a Floating Ledge You Can Swap Out Every Season

Install a single floating ledge above the tub or vanity, then treat it like a rotating display instead of a fixed shelf. The ledge itself stays plain and narrow, just deep enough to hold a few small objects without crowding.
What changes is everything on top of it. Keep two or three anchor pieces the same year round, like a small dish or a plain vase, and rotate everything else around them.
The payoff is a wall that feels current without repainting or rehanging anything, just restyling what’s already sitting on the ledge.
4. Set a Single Statement Tile Into the Wall Like Art
The blank wall across from the vanity in a friend’s rental had three years of half committed poster tape marks on it before we finally solved it with one oversized tile instead of another print.
A single hand painted or patterned tile, mounted with a strong adhesive tab rather than grout, does the same job as artwork but holds up to steam and splashes without warping.
Center it at eye level and give it real breathing room. One tile surrounded by blank wall reads as art. Three crowded together reads as a leftover sample.
📌 Good To Know
If you’re renting, look for a removable mounting tab rated for tile weight so the tile comes down clean without damaging paint or drywall.
5. Add a Driftwood Shelf With Trailing Plants Over the Tub

Real plants near a tub aren’t a maintenance trap if you pick the right ones and skip the soil altogether. Pothos and philodendron cuttings root and grow in a jar of water for months, which means no dirt, no spills, and no drainage to worry about.
Mount a rough, unfinished piece of driftwood as the shelf itself so the wood does the visual work instead of a bracket.
- Use narrow glass jars so the water level is easy to check at a glance
- Trim the cuttings back once they outgrow the shelf’s width
This one works best over a tub that gets some natural light, not a windowless shower stall.
A bare stretch of wall above the tub with nothing but tile and steam stains.
A driftwood shelf holding trailing greenery in glass jars, no soil or drainage required.
6. Mount a Row of Woven Baskets as Functional Wall Art
A row of shallow woven baskets mounted flush against the wall reads as a pattern before anyone realizes they’re actually storage. The weave catches shadow in a way flat art never does, especially under a side window or a warm bulb.
Skip anything deep enough to hold towels. The point here is the texture on the wall, not extra bulk sticking out. Three or four baskets in slightly different weaves, mounted with simple screws through the back, hang flat enough to double as shelves for folded washcloths.
Rotate them off the wall for cleaning every few months so dust doesn’t settle into the grooves.
What to grab first
7. Install One Arched or Scalloped Mirror as the Focal Point

Keep the mirror shape unusual and the frame quiet. That’s really the whole rule for making an arched or scalloped mirror the one thing people notice walking in.
A plain brass or matte black frame lets the curved silhouette do the work, while a busy carved frame competes with itself. Hang it slightly higher than a standard vanity mirror, closer to where a piece of art would sit, so it reads as a design choice rather than a grooming tool.
This works best as the only mirror in the room. Adding a second flat mirror nearby cancels out the effect.
An unusual mirror shape only reads as a focal point when the frame stays simple and nothing else in the room competes with it.
8. Frame the Vanity With a Wallpaper Inset Instead of a Full Wall
Paper just the recessed section behind the vanity instead of the whole wall, using a bold pattern that would feel like too much across four walls but works as a contained inset.
Measure the recess first, then order a panel with two or three inches of overage on each side for trimming. Paste the paper before the mirror goes back up so the edges tuck cleanly behind the frame.
- Choose a paste-the-wall style for easier removal later
- Seal the top edge with a thin line of clear caulk to block steam
This holds up better in a powder room with a fan than a shower heavy bathroom.
Measure the recessed section behind the vanity, not the full wall.
Order a panel with two to three inches of extra width on each side.
Paste the paper, then remount the mirror so its frame covers the raw edges.
9. Swap Flat Lighting for Sculptural Wall Sconces
Most bathrooms rely on one flush mount fixture centered over the mirror, which flattens everything and leaves faces washed out. Sculptural wall sconces flanking the mirror instead throw light from the sides, which is both more flattering and more interesting to look at.
Look for fixtures with an opaque or fluted glass shade rather than exposed bulbs, since damp air fogs clear glass faster than expected. Mount them at roughly eye level, spaced to frame the mirror rather than the whole vanity.
Swap the bulbs for a warm color temperature. Cool white light next to a mirror tends to make the whole room feel clinical.
Mount sconces at eye level, flanking the mirror.
Use warm toned bulbs near the mirror.
One flush overhead fixture as the only light source.
Exposed clear glass bulbs in a steamy room.
10. Arrange a Small Cluster of Ceramic Plates on the Wall

A cluster of mismatched ceramic plates works the same way a gallery wall does in a living room, except almost nobody thinks to try it in a bathroom. The scale is usually smaller, which actually makes it easier to get right on a narrow wall.
Pick plates that share a rim color or glaze finish even if the patterns differ completely. Use plate hangers rated for the actual weight of ceramic, not the lightweight clips made for decorative tin.
Odd numbered groupings, five or seven, read as more intentional than an even count.
- ▸Thrift stores often have single plates cheaper than full sets.
- ▸Check your own cabinet for chipped pieces no longer used for food.
- ▸Estate sales tend to have the most unusual glaze colors.
11. Hang Dried Flower Bunches Upside Down Near the Mirror
Fresh flowers in a bathroom wilt fast between the steam and the lack of a vase most people bother refilling. Dried bunches skip that problem entirely and actually look better a few weeks in, once the stems curl slightly and the color mutes.
Hang small bunches upside down from a single nail or hook near the mirror, tied at the stem with plain twine. Lavender, pampas grass, and eucalyptus all dry well and hold their shape for months without shedding much.
Keep the bunches small. A few stems reads as decor. A giant armful starts looking like storage.
12. Add a Wood Slat Panel With Brass Hooks for Towels
Quick mistake a lot of people make: hanging a single towel bar and calling the wall finished, when a slatted wood panel does double duty as texture and storage in the same footprint.
Thin wood slats mounted with a small gap between each one add a linear pattern that a flat towel bar never gives you. Attach a few brass hooks directly into the slats for hand towels or robes, spaced far enough apart that nothing overlaps.
Seal the wood with a water resistant finish before mounting, especially if it’s going anywhere near direct spray.
What to grab first
13. Try a Limewash or Textured Paint Finish on One Wall
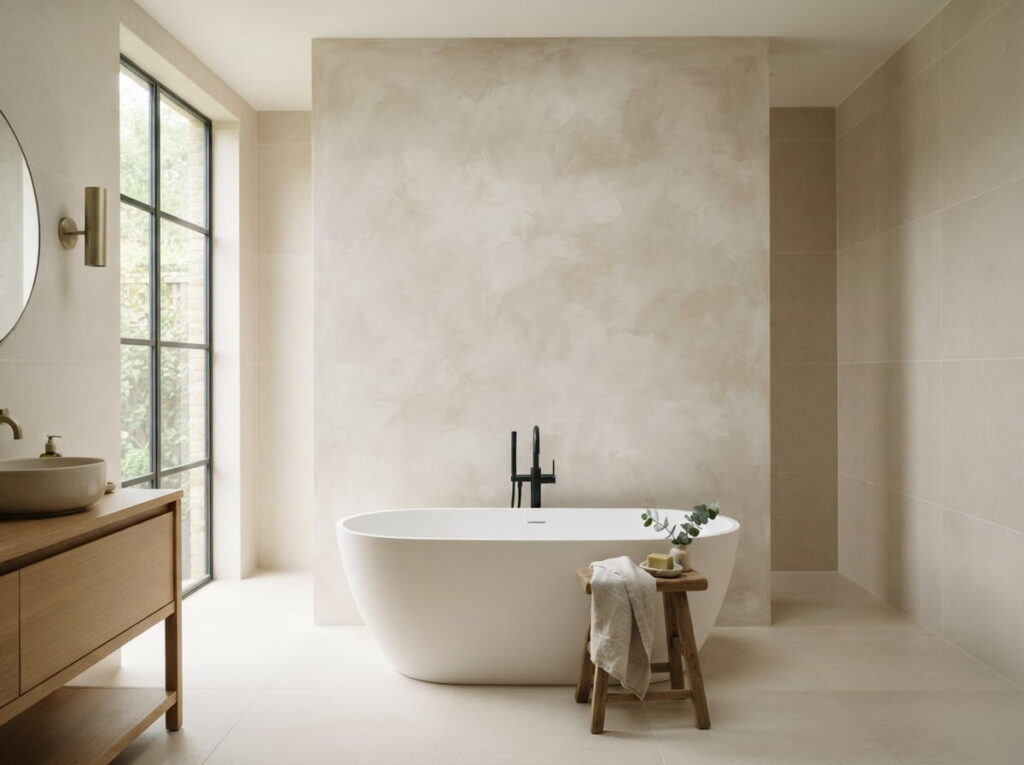
Flat paint does nothing for a bathroom wall that gets natural light through the day. Limewash catches that light differently depending on the angle, giving one wall a soft, cloudy variation that a roller and a single coat of regular paint can’t fake.
Pick just one wall, usually the one behind the tub or the vanity, rather than the whole room. Limewash needs a breathable, unsealed surface to take properly, so check the finish under any existing paint before starting.
It also holds up well in humidity once cured, which flat paint sometimes struggles with over time.
Limewash on a single wall gives more visual depth than paint on all four, and it holds up better in a humid room once fully cured.
Conclusion
A bathroom wall doesn’t need a fourth framed print to finally feel finished. Texture, shape, and a little unevenness usually do more than another flat picture ever could, whether that’s a cluster of mismatched mirrors, a single oversized tile, or one wall of limewash that catches the morning light differently every day.
Start with whichever bathroom wall decor idea fits your walls, your budget, and how much time you actually want to spend this weekend. A few of these take fifteen minutes. Others are a slower project worth doing right.
Leave a Reply